The First Rule of Travel Data: Know Your Phone
Look, I've seen it all. Backpackers stuck at Budapest Keleti, phone in hand, sweating because their 'unlocked' iPhone is actually tethered tighter than a Swiss bank account. Before you even think about buying an eSIM for your next trip, whether it's for a quick weekend in Berlin or a month-long festival circuit across Europe, you need to confirm one non-negotiable fact: Is your iPhone unlocked? It sounds simple, but this one detail can save you a world of pain and, more importantly, a heap of euros.
I remember one trip to Glastonbury, where a mate of mine, despite all my warnings, showed up with a locked phone. He ended up paying €15 a day for a slow, patchy roaming plan from his home carrier. Meanwhile, I was cruising on a Cellesim eSIM, getting solid 5G coverage even in the main arena, for a budget-friendly daily rate. The difference adds up quickly. Over 8 days, that's €120 versus a much lower cost with Cellesim. When you're trying to do a country on €40/day, that extra €100 for data is a bus ticket, two hostel nights, or about 20 local beers.
Why a Locked Phone is a Budget Traveller's Nightmare
A carrier-locked phone means it's configured to work exclusively with the network you bought it from, like AT&T or Vodafone UK. This setup is often tied to contract deals, where the phone is subsidised in exchange for your loyalty. The problem? When you land in a new country, your phone will refuse to connect to any local network, including the ones Cellesim uses. You'll be stuck with your home carrier's exorbitant international roaming rates, which are designed to fleece you, not serve you. Trust me, I've seen the bills. They're terrifying.
Carrier Locked or Unlocked: How to Check Your iPhone
This is the critical first step. Don't guess, don't assume. Verify. There are a few ways to do this, and some are more definitive than others. You want certainty here, not a 'maybe it's unlocked' shrug.
The Settings App Method: Your First Port of Call
This is the quickest way to get an initial read on your iPhone's status. It's usually accurate, but for absolute peace of mind, especially if you bought your phone used, I'd still recommend a secondary check.
- Open Settings: Tap the grey gear icon on your home screen.
- Navigate to General: Scroll down and tap on 'General'.
- Tap About: You'll see a lot of information here, including your model name and software version.
- Look for 'Carrier Lock': Scroll down until you see the 'Carrier Lock' entry.
- Interpret the Result:
- "No SIM restrictions": Bingo! Your iPhone is unlocked and ready for any eSIM or physical SIM card from any carrier worldwide.
- "SIM locked" or a carrier name: This means your phone is locked to a specific carrier. You'll need to contact them to unlock it.
The Physical SIM Swap Test: For Older iPhones or Double-Checking
If you're still on an older iPhone that uses a physical SIM tray, or if you just want to be absolutely sure after the Settings check, this method is foolproof. You'll need a SIM card from a different carrier than your current one.
- Get a Different SIM: Borrow one from a friend who uses a different network, or if you're already abroad, buy a cheap local SIM from a corner shop (don't activate it, you just need the card itself).
- Remove Your Current SIM: Use a paperclip or SIM ejector tool to pop out your existing SIM card.
- Insert the New SIM: Put the borrowed/new SIM card into your iPhone.
- Check for Signal: If your iPhone picks up a signal and allows you to make a call or connect to data (even if you don't have a plan on that SIM), it's unlocked. If you get a "SIM Not Supported" or "Network Locked" message, it's locked.
Contacting Your Carrier: The Definitive Answer
This is the most reliable way to confirm your phone's status and, if necessary, initiate the unlocking process. Every carrier has different policies, but generally, if you've fulfilled your contract, they're legally obliged to unlock your phone.
I've had to do this with my old O2 UK iPhone. They had a specific online form and it took about 3 business days for the unlock to process. Keep a record of your IMEI number (found in Settings > General > About) as they'll ask for it.
The Unlocking Process: What to Expect
So, your phone is locked. Don't panic, it's not the end of your budget travel dreams. It just means a bit of homework before you hit the road. The process itself is usually straightforward, but patience is key.
Carrier-Specific Unlocking Policies
Policies vary wildly. Some carriers, like T-Mobile in the US or some European providers, are relatively easy to deal with once your contract is up. Others, like AT&T, can be a bit more finicky, sometimes requiring you to jump through more hoops. Generally, they require:
- Contract Fulfilment: You must have completed your payment plan or contract term.
- Account in Good Standing: No outstanding bills or issues with your account.
- IMEI Number: Your phone's unique identifier.
- Waiting Period: Some carriers might have a cooling-off period after contract completion before they'll process an unlock request.
For example, if you're with AT&T, you can request an unlock via their online portal. It's usually processed within 48 hours if you meet the criteria. If you're denied, they'll tell you why. Sometimes it's as simple as needing to pay off a final bill.
Steps to Request an Unlock from Your Carrier
- Gather Information: Have your account number, phone number, and IMEI number ready.
- Contact Support: Use your carrier's dedicated unlock request page, customer service line, or in-store support. Be polite but firm.
- Submit Request: Follow their instructions for submitting the unlock request.
- Wait for Confirmation: They'll typically send you an email or SMS when the unlock is processed. This can take anywhere from a few hours to several business days.
- Connect to iTunes/Finder (if prompted): Some older iPhones might require you to connect to iTunes or Finder on a computer to complete the unlock. Newer iPhones usually receive the unlock over the air.
Why an eSIM is a Budget Backpacker's Best Friend
Why an eSIM is a Budget Backpacker's Best Friend
Once your iPhone is unlocked, a whole world of cheap data opens up. And frankly, for a budget backpacker, eSIMs are a no-brainer. I've been using them for years, especially when crossing borders every few days, say, on a rail trip through the Balkans.
Cost Savings That Actually Matter
This is where the rubber meets the road. Roaming with your home carrier is a rip-off. Plain and simple. I once saw a traveler pay €50 for 1GB of data in Albania. With Cellesim, you can often get 10GB for a competitive price in most European countries. That's a huge difference when you're counting every euro.
Consider this: a 14-day trip to Greece. If you're hitting up festivals like Rockwave or just exploring the islands, you'll burn through data. A local physical SIM from Cosmote might cost you €20 for 10GB. A Cellesim regional eSIM for Europe could give you 20GB for a great value, covering multiple countries. If you're only in Greece, the local SIM might be marginally cheaper, but the convenience of an eSIM, especially for multi-country travel, is usually worth the small difference.
Convenience: No More Scrambling for Local SIMs
Picture this: You just landed at Istanbul Airport, exhausted after an overnight bus from Sofia. The last thing you want to do is hunt for a SIM card vendor, haggle over prices, and then fumble with tiny trays and activation codes. With an eSIM, you land, switch on your phone, and you're connected. You can order it from your hostel bed in advance and activate it the moment you need it.
The Dual SIM Advantage
All modern iPhones (XR and later) support dual SIM functionality: one physical SIM and one or more eSIMs. This is a game-changer for budget travelers. You can keep your home physical SIM active for important calls/texts (or just to receive OTPs for banking apps) and use your eSIM for all your data needs abroad. This means no missed calls from home and no exorbitant roaming charges. It’s the best of both worlds, saving you money on data without cutting you off from your home network entirely.
eSIM Activation on iPhone: A Step-by-Step Guide
Once your iPhone is unlocked and you've picked your Cellesim plan, activation is usually a breeze. I've done this dozens of times, from the chaotic border crossing between Vietnam and Cambodia to the quiet cafes of Lisbon. It rarely takes more than a couple of minutes.
Pre-Activation Checklist
- Unlocked iPhone: Confirmed, right?
- Stable Wi-Fi Connection: You'll need this to download your eSIM profile. Don't try to activate it in a dead zone.
- eSIM Activation Details: This will be a QR code or manual entry details provided by Cellesim (or any other eSIM provider). Keep it handy.
- Sufficient Battery: Don't start this process on 5% battery, especially if you're in an unfamiliar place.
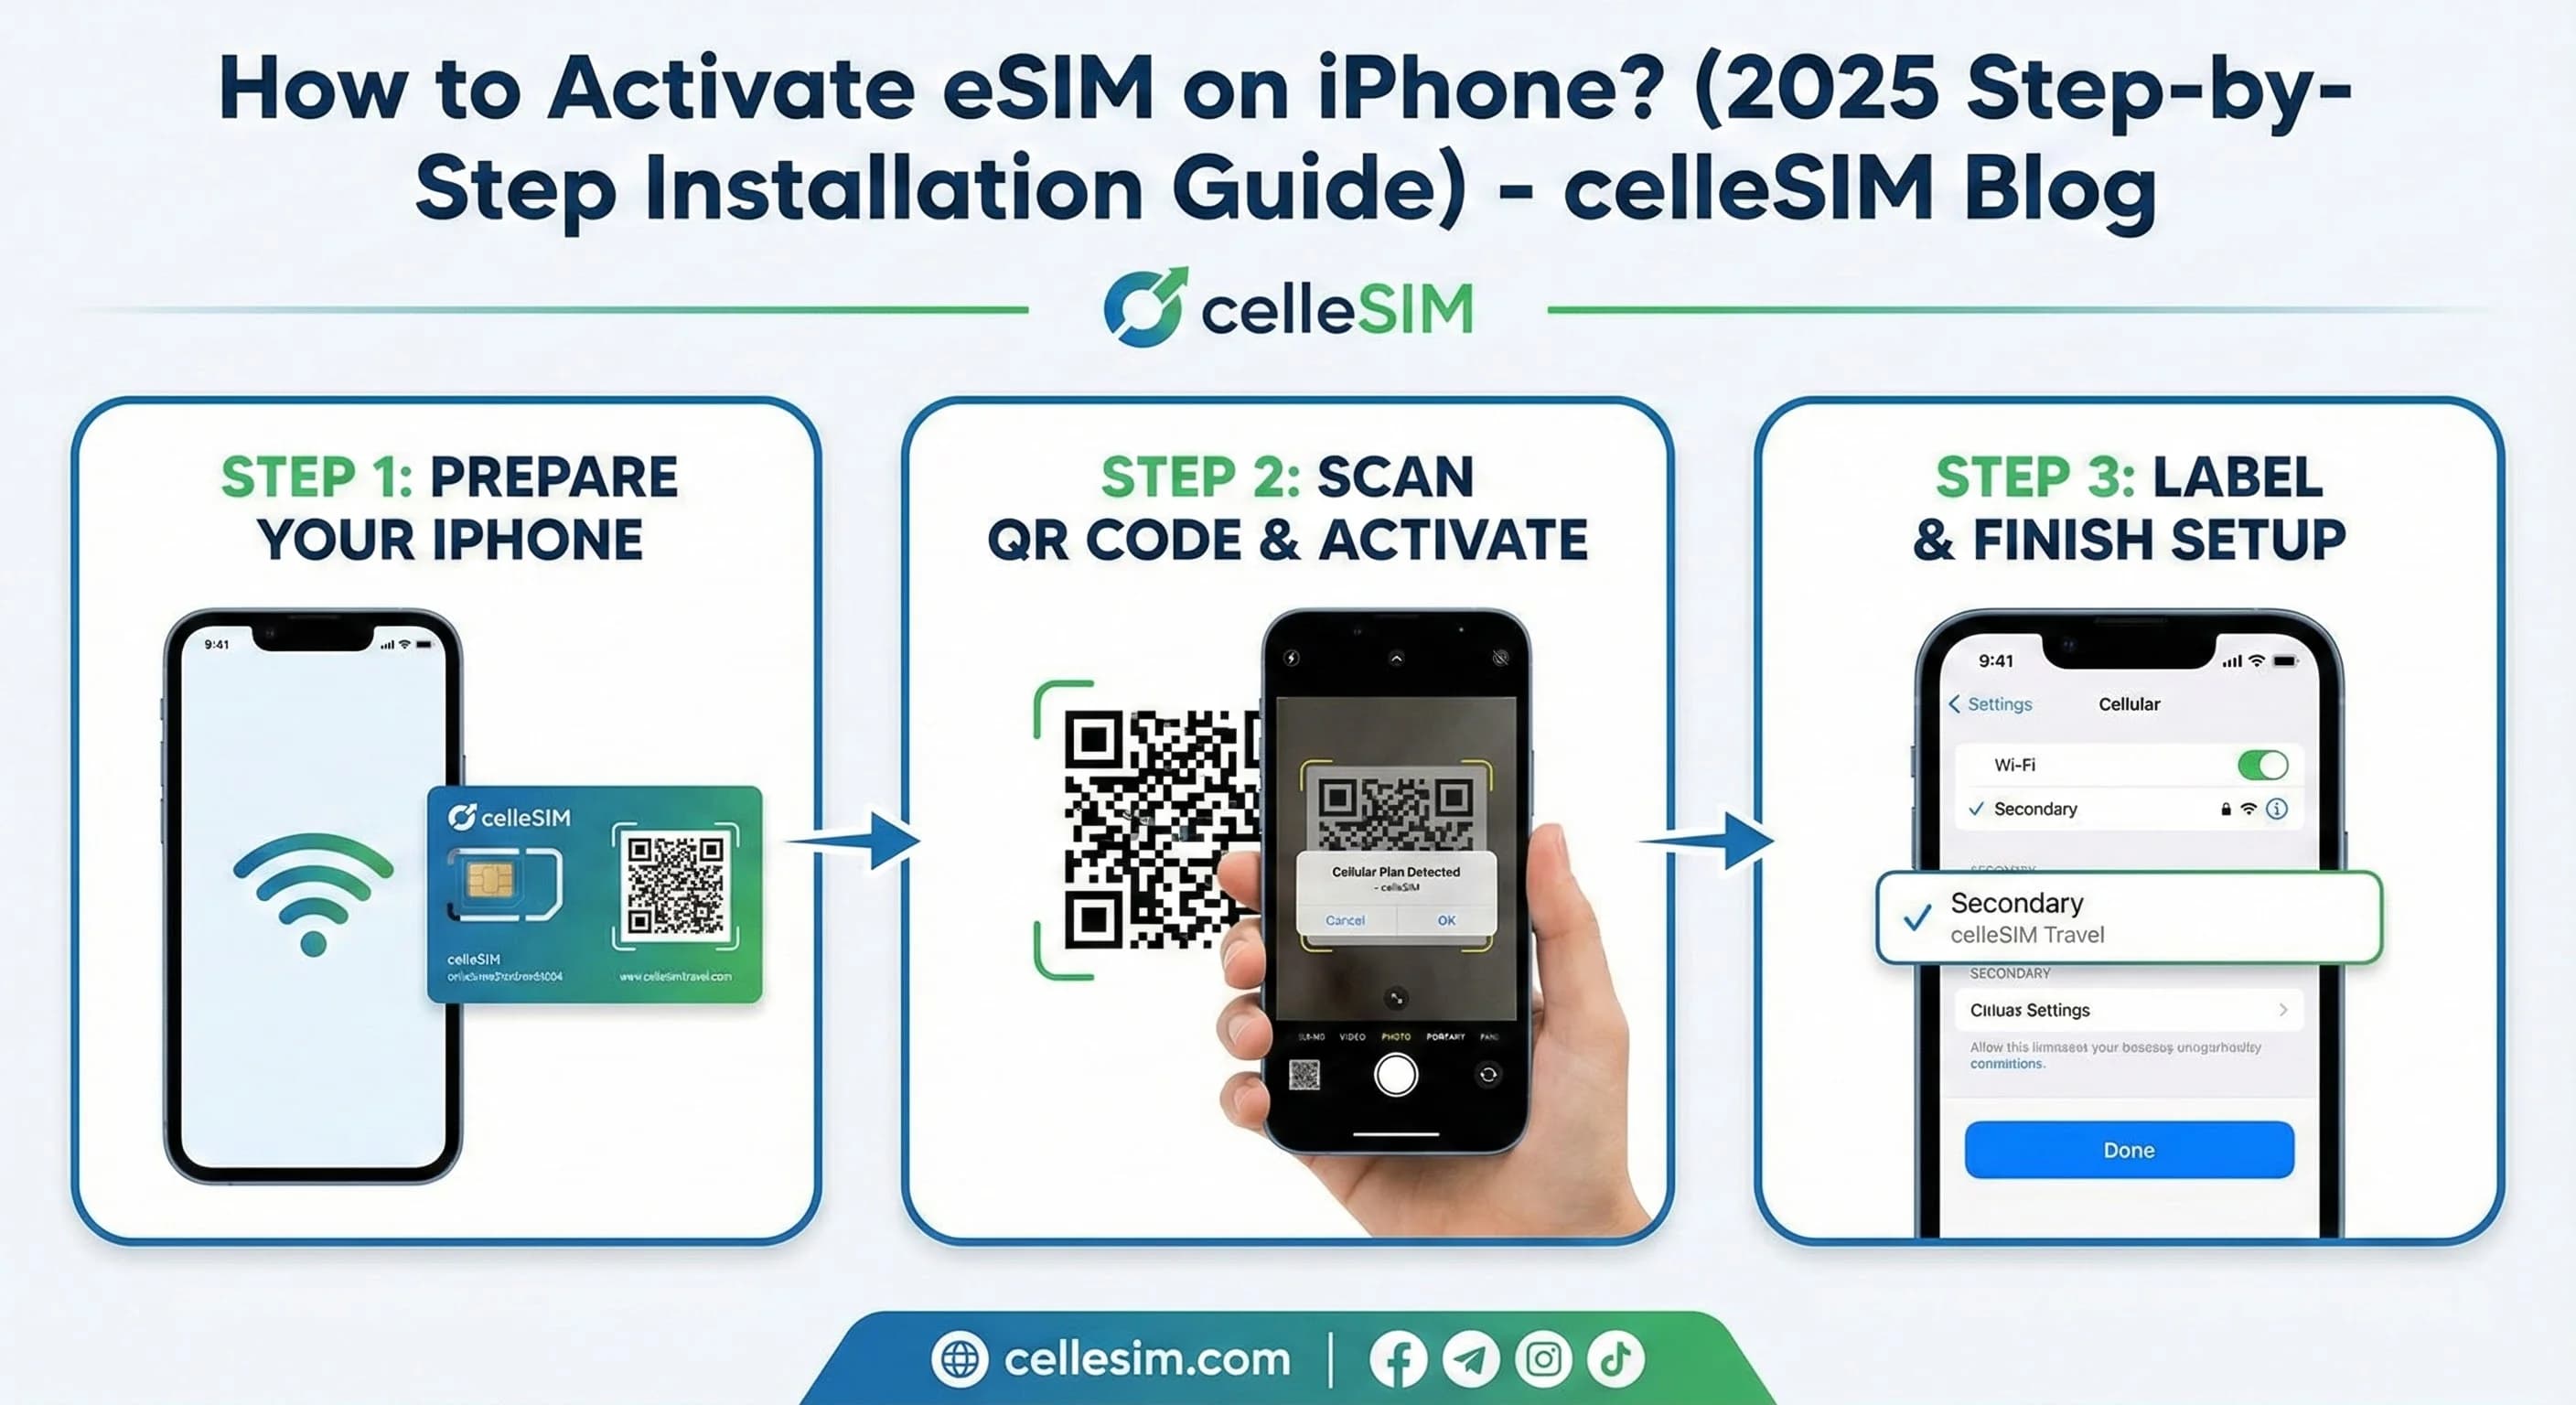
The QR Code Method: The Easiest Way
The QR Code Method: The Easiest Way
This is my preferred method. It's quick, intuitive, and generally problem-free.
- Go to Settings: Tap the Settings app.
- Tap Cellular/Mobile Data: Scroll down and tap this option.
- Add eSIM: Tap 'Add eSIM'.
- Use QR Code: Select 'Use QR Code'.
- Scan the QR Code: Position your iPhone camera over the QR code provided by Cellesim. It should detect it almost instantly.
- Confirm & Label: Follow the on-screen prompts to confirm the cellular plan. You'll then be asked to label your plans (e.g., 'Primary' for your home SIM, 'Travel' for your eSIM). Choose wisely, this helps with data management later.
- Set Default Line: When prompted, select your new eSIM as your primary line for 'Cellular Data'. You can keep your home line for calls and texts if you wish.
Manual Entry: When the QR Code Fails or is Unavailable
Sometimes, you might not have a second screen to display the QR code, or your camera might be acting up. Manual entry is a good backup.
- Follow Steps 1-3 Above: Settings > Cellular/Mobile Data > Add eSIM.
- Enter Details Manually: Select 'Enter Details Manually'.
- Input SM-DP+ Address & Activation Code: You'll be given these by your eSIM provider. Type them in carefully. Double-check for typos!
- Confirmation: Proceed through the remaining prompts to confirm and label your new eSIM.
Local SIM Card vs. eSIM: Doing the Math on the Ground
I'm a firm believer in transparency. While eSIMs are often the best choice, especially for multi-country trips, there are times when a local physical SIM might squeak ahead on price, particularly if you're staying in one country for an extended period. It all comes down to the numbers.
| Factor | Cellesim eSIM (Europe Example) | Local Physical SIM (Greece Example) |
|---|---|---|
| Purchase Method | Online, before you leave home | At airport, kiosk, or phone shop |
| Activation Time | Minutes, instant connection on arrival | 15-30 min (purchase, registration, activation) |
| Price (10GB, 30 days) | €20-€25 (multi-country) | €15-€20 (single country, sometimes requires ID) |
| Convenience | High, no physical swap, multi-country coverage | Moderate, physical swap, country-specific |
| ID Requirements | Usually none | Often passport registration required |
| Reusability | Easy to top-up or buy new regional plans | Dispose of after trip, new one for next country |
The Cost of a Local SIM Card: The Hidden Fees
While the advertised price for a local SIM might seem lower, factor in the time and hassle. You have to find a store, potentially deal with a language barrier, register your passport (mandatory in many countries like Turkey or Egypt), and then hope it activates correctly. That's time you could spend exploring a new city, not stuck in a phone shop. I always factor my time as worth about €10-€15 an hour when traveling. If a local SIM takes me an hour, that's already offset any small price saving.
Sometimes, local SIMs also have 'activation fees' or require a minimum top-up that isn't clearly advertised. In countries like Ethiopia, buying a local Ethio Telecom SIM might be the only viable option in some remote areas, but expect a bureaucratic process and potentially unreliable service. Always weigh the logistical challenges of local connectivity.
Data Consumption: Real-World Numbers for Travelers
How much data do you actually need? This is crucial for picking the right eSIM plan and not overspending. I track my data like a hawk, especially when I'm on a tight budget. Most travelers overestimate their needs.
| Activity | Typical Data Usage (per hour) | Sophie's Budget Tip |
|---|---|---|
| Google Maps Navigation | 5-10 MB | Download offline maps beforehand. Saves a ton! |
| Social Media (scrolling, light uploads) | 50-100 MB | Use Wi-Fi for video uploads. Disable auto-play videos. |
| Messaging (WhatsApp, Signal) | 5 MB (text only) to 50 MB (calls/photos) | Stick to text for daily updates. |
| Email (checking, light sending) | 10-20 MB | Fetch emails less frequently. |
| Streaming Music (Spotify, Apple Music) | 40-150 MB | Download playlists over Wi-Fi. |
| Video Streaming (Netflix, YouTube) | 200 MB - 1 GB+ | Strictly Wi-Fi only. Never on mobile data unless emergency. |
Calculating Your Data Needs: The Sophie Clarke Method
Here's my rough calculation for a typical travel day:
- Navigation: 30 minutes active use, 2-3 times a day = ~30 MB
- Social Media: 1 hour total, scattered throughout the day = ~80 MB
- Messaging: Constant, with a few photos = ~50 MB
- Emails/Browsing: 30 minutes total = ~30 MB
- Emergency Search/Translation: 15 minutes = ~20 MB
Total per day: Roughly 210 MB. Let's round up to 250 MB (0.25 GB) to be safe. For a 10-day trip, that's 2.5 GB. For 20 days, 5 GB. If you're going to a festival like a major electronic music festival in Belgium where you're constantly uploading stories and trying to find friends in crowded areas, you might double that daily estimate, hitting 500 MB to 1 GB/day. But for standard backpacking, you don't need a huge plan.
Border Crossing and Multi-Country Hacks
This is where eSIMs truly shine, especially for us budget backpackers who tend to cross borders like they're turnstiles. The ability to seamlessly switch networks without physical SIM cards is invaluable.
The Seamless Border Hop
Imagine you're on the night bus from Belgrade to Sarajevo. You fall asleep in Serbia, wake up in Bosnia. With a multi-country Cellesim eSIM, your phone automatically connects to the local network as soon as you cross the border. No fumbling with SIM cards in a dark bus, no hunting for Wi-Fi at a roadside stop. This isn't luxury, it's tactical efficiency. It means you can immediately check bus schedules, hostel directions, or emergency contacts the moment you arrive. This is particularly crucial in places like the Balkans, where local SIMs can be a hassle to acquire on the fly at a border crossing.
eSIMs for Regional Travel: A Cost-Effective Strategy
Cellesim offers regional plans that cover multiple countries, often at a better rate than buying individual SIMs for each country. For example, a Europe-wide eSIM covers dozens of countries. If you're doing a whirlwind tour of Western Europe, hitting France, Belgium, Netherlands, and Germany, a single regional eSIM is far more economical and convenient than buying four separate local SIMs. Compare this to options like Nomad eSIM alternatives, and you'll often find Cellesim offers competitive rates for broad regional coverage.
| Scenario | Best Connectivity Solution | Cost Saving (Estimate) |
|---|---|---|
| Single Country, Long Stay (e.g., 1 month in Italy) | Local physical SIM (might be slightly cheaper per GB) | €0-€5 (vs. eSIM) |
| Single Country, Short Stay (e.g., 7 days in Portugal) | Cellesim eSIM (convenience often outweighs marginal local SIM price difference) | €5-€10 (vs. roaming) |
| Multi-Country Trip (e.g., 2 weeks, 3-4 EU countries) | Cellesim Regional eSIM (unbeatable convenience & cost) | €20-€40 (vs. individual local SIMs or roaming) |
| Remote Area Travel (e.g., Hiking in Tatra Mountains) | Check local carrier coverage maps, potentially local SIM for strongest signal | Reliability over cost in specific cases |
Troubleshooting Common eSIM Issues on iPhone
Even with the best planning, sometimes things go wrong. I've been there: staring at 'No Service' when I absolutely need to find my hostel. Here are the common fixes I've learned from countless trips.
No Service or No Data?
This is usually the most frustrating issue. Before you panic, run through these checks:
- Enable Data Roaming: For some eSIMs, especially those that roam across partner networks, you might need to enable 'Data Roaming' for that specific eSIM line. Go to Settings > Cellular/Mobile Data > Select your eSIM > Toggle 'Data Roaming' ON. (This doesn't mean you're paying roaming charges, it just allows your eSIM to connect to the partner network it's designed to use.)
- Check APN Settings: Sometimes, the Access Point Name (APN) settings aren't configured automatically. Your eSIM provider should give you these. Go to Settings > Cellular/Mobile Data > Select your eSIM > Cellular Data Network. Enter the APN details there.
- Restart Your iPhone: The classic IT fix. Often, a simple reboot is all it takes for your phone to register the new eSIM properly.
- Toggle Airplane Mode: Turn on Airplane Mode for 30 seconds, then turn it off. This forces your phone to re-scan for networks.
- Manual Network Selection: In some rare cases, your phone might struggle to auto-select the best network. Go to Settings > Cellular/Mobile Data > Select your eSIM > Network Selection > Turn off 'Automatic' and manually select an available network.
eSIM Not Appearing After Installation?
If you've gone through the installation steps and your eSIM isn't showing up under Cellular Plans, it's usually one of two things:
- Incomplete Installation: Re-scan the QR code or re-enter the manual details. Ensure you're following every prompt.
- Poor Wi-Fi: If your Wi-Fi connection was weak or dropped during the download, the eSIM profile might not have fully installed. Find a stronger Wi-Fi signal and try again.
- Check Cellesim Account: Log into your Cellesim account online. Does it show the eSIM as active? If not, contact their support.
Contacting Support
If all else fails, reach out to Cellesim's customer support. They're usually quick and can often push the eSIM profile to your device or diagnose the issue remotely. Have your order number and IMEI ready to speed things up. Many common questions are also answered in the Cellesim FAQ, which can be a quick problem solver.
Final Thoughts on Staying Connected on a Budget
Staying connected on the road shouldn't break the bank. My 8-day trip through Croatia and Slovenia last summer cost me a very reasonable amount for 10GB of data with a regional Cellesim eSIM. I averaged about 1.25 GB a day, mostly for maps, hostel bookings, and quick uploads to my Substack. That's a budget-friendly daily rate for reliable 4G/5G. It allowed me to find the cheapest hostels in Split's Old Town, navigate the bus system in Ljubljana without getting ripped off, and even stream some music while waiting for a ferry to Hvar.
Compare that to someone who forgets to unlock their iPhone and relies on their home carrier's roaming. They could easily spend €10-€15 a day for far less data. Over the same 8 days, that's €80-€120 for data, a huge chunk out of a tight budget. That's the difference between eating street food every night and cooking your own meals in the hostel kitchen, or taking a local bus versus an expensive taxi.
So, get your iPhone unlocked. Embrace the eSIM. It's one of the simplest, yet most impactful, ways to keep your travel costs down and your stress levels lower. Happy travels, and may your data always be plentiful and cheap!
Frequently Asked Questions
How do I know if my iPhone supports eSIM?
All iPhone models released since 2018, starting with the iPhone XS, XS Max, and XR, support eSIM technology. Check your iPhone's model number in Settings > General > About to confirm compatibility, and ensure it's running iOS 12.1 or newer for full eSIM functionality.
Can I use an eSIM if my iPhone is carrier-locked?
No, a carrier-locked iPhone will not allow you to activate or use an eSIM from a different provider. You must first contact your original carrier and request that they unlock your device. This is a crucial step before purchasing an international eSIM plan.
What is the difference between a physical SIM and an eSIM for travel?
A physical SIM is a small plastic card you insert into your phone, whereas an eSIM is a digital SIM profile embedded in your phone's hardware. For travelers, eSIMs offer greater convenience by allowing instant activation and switching plans remotely, often supporting multiple countries without needing to swap physical cards.
How much data do I typically need for international travel?
For budget backpackers focused on navigation, messaging, and light social media, around 250-500 MB per day is usually sufficient. For a 10-day trip, a 2.5GB to 5GB eSIM plan is a good starting point. Heavy streaming or video calls will require significantly more data, so plan accordingly.
Is it cheaper to buy a local SIM card or an eSIM for a single country trip?
For a long stay in a single country, a local physical SIM card might be marginally cheaper per gigabyte. However, eSIMs often offer superior convenience, instant activation, and avoid the hassle of registration and language barriers, making them a strong contender even for single-country trips, especially shorter ones.
Can I keep my home phone number active while using an eSIM abroad?
Yes, modern iPhones (XR and newer) support Dual SIM functionality, allowing you to use your physical home SIM for calls and texts while simultaneously using an eSIM for mobile data abroad. This means you can receive calls and texts on your home number without incurring expensive roaming data charges.