
Why Your eSIM Number is Your Travel BFF
Look, when you're on the road, every euro counts. And when your data connection goes sideways, the clock starts ticking on how much more you'll spend trying to fix it. Your eSIM Identification Document, or EID, isn't just a random string of numbers, it's your lifeline. Think of it as the serial number for your digital SIM profile. Without it, customer support, whether from your Nomad eSIM provider or a local carrier, can't verify your profile or help you troubleshoot. It's the key to getting back online without burning through your limited funds.
I once spent 8 days in rural Georgia, only to discover my newly activated eSIM wasn't connecting to the local Magti network. I'd bought a plan for €28, thinking I was set. Turns out, a small typo in the activation process meant my profile was stuck. I needed my EID to get Cellesim support to remotely reset it. That's 8 days of scrambling for hostel Wi-Fi and paying €0.50 per text message from my UK number. Total spent on data for that trip: €28 for the eSIM, plus another €15 on local café Wi-Fi and emergency SMS. If I'd known how to find that EID instantly, I'd have saved at least €10 and a lot of headaches.
What is an EID and Why is it Crucial?
The EID is a unique, 32-digit identifier permanently embedded in your device's eSIM chip. It's like the IMEI for your physical phone, but specifically for the eSIM hardware. Every device capable of hosting an eSIM has one. When you purchase an eSIM plan, your provider links that plan to your device's EID. This is how they provision the service, ensuring your data package lands on your specific phone or tablet.
Its importance boils down to three core functions:
- Activation: Some providers require you to manually input your EID during the setup process, especially if QR code scanning fails.
- Support: When troubleshooting, the first thing any support agent will ask for is your EID. It allows them to locate your profile on their system and diagnose connectivity issues.
- Transfer: Moving an eSIM from one device to another often involves verifying the EID of both the old and new devices.
Common Scenarios Where Your EID Saves the Day
Imagine you're at the border crossing from Laos into Cambodia, the bus is waiting, and your data just decided to quit. You've got an eSIM covering multiple countries, but it's not connecting to Cellcard or Smart. The local SIM card vendor at the border post is hawking cards for 5,000 Riel (about €1.15) for 1GB, but you just bought 5GB for €12 online. You need to call support. They'll ask for that EID. Without it, you're either buying the overpriced local SIM or praying for Wi-Fi at the next hostel.
Another scenario: you're trying to activate a new eSIM for your family's iPhone abroad, but the QR code isn't scanning. The provider instructs you to enter the details manually, including the EID. Without it, that €40 family data plan sits there useless. Trust me, it's better to know where this number is before you hit the road.
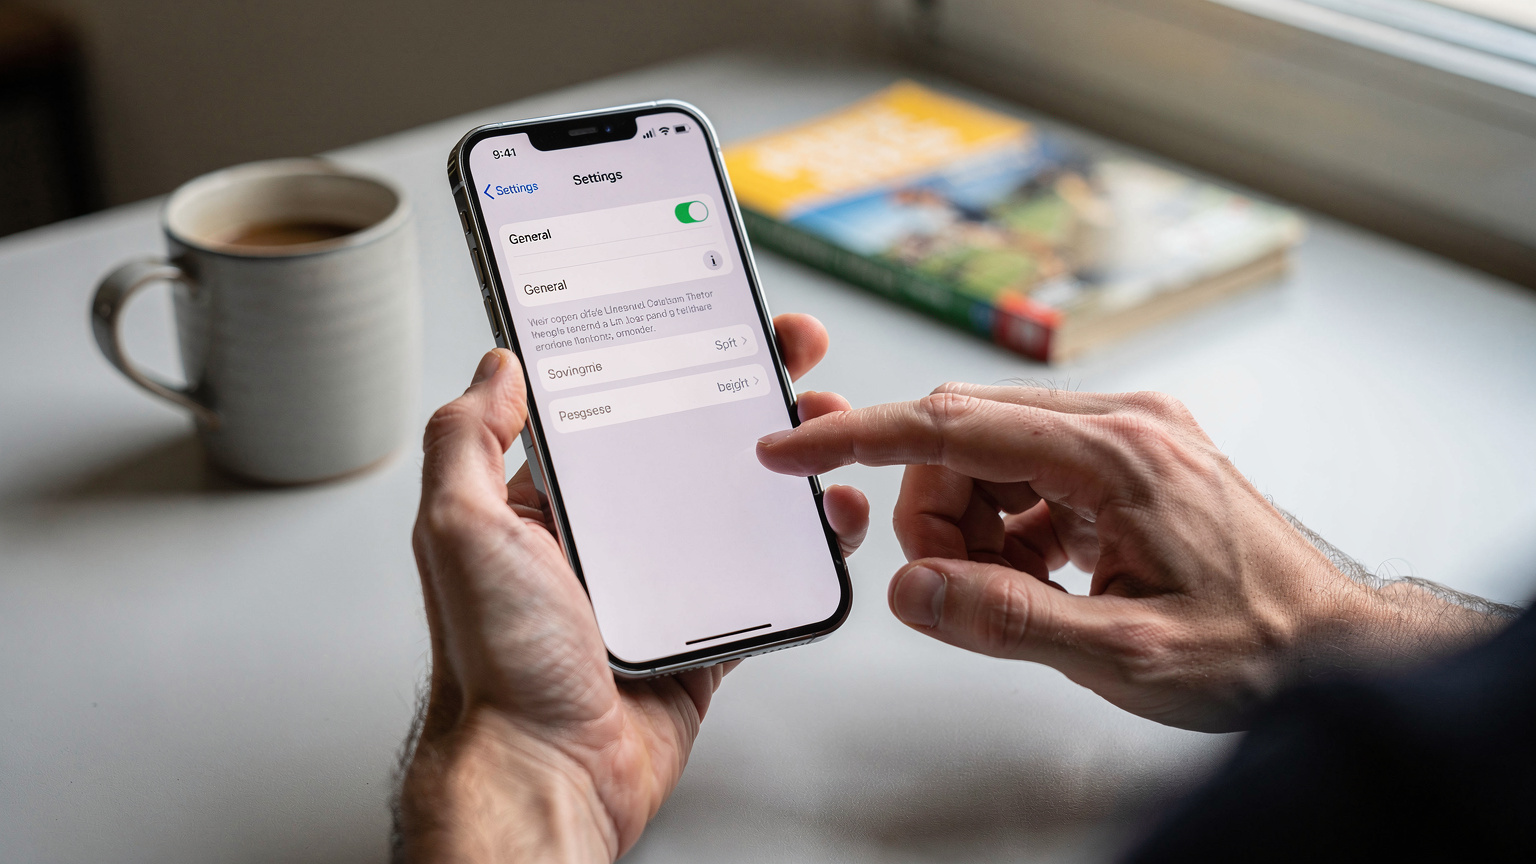
Finding Your eSIM Number on iPhone (iOS 18 Update)
Apple makes finding your EID relatively straightforward, and it hasn't changed much with the latest iOS 18 updates. It's usually buried in the 'About' section, alongside all your other device identifiers. This process is consistent across iPhones that support eSIM, from the iPhone XS/XR all the way to the iPhone 15 series.
Step-by-Step Guide for iPhone Users:
- Open Settings: Tap the grey 'Settings' icon on your home screen.
- Navigate to General: Scroll down and tap 'General'.
- Tap About: Select 'About' from the General menu.
- Locate EID: Scroll down again. You'll see a section labelled 'EID'. Your eSIM number is the 32-digit string displayed there. You can tap and hold to copy it, which is handy for pasting into support chats or forms.
What if Your EID isn't Visible?
Sometimes, particularly if you haven't activated any eSIMs yet, the EID might not immediately show up. If you don't see it, it's usually one of two reasons:
- No eSIM Profile Activated: Your phone's eSIM hardware is there, but until you add an eSIM profile (even a free trial one), the EID might remain hidden. Try activating a dummy eSIM or a small, cheap plan, and then check again.
- Software Glitch: A quick restart often fixes minor display issues. If that doesn't work, ensure your iOS is up to date. Major updates sometimes include firmware fixes for eSIM functionality.
Locating Your eSIM Number on Android Devices
Android devices, bless their diverse hearts, can be a bit more varied in their menu structures. What's true for a Samsung Galaxy might be slightly different for a Google Pixel or a Xiaomi. Still, the general path to finding your EID is similar across most modern Android phones that support eSIM technology.
Step-by-Step Guide for Android Users:
- Open Settings: Find and tap the 'Settings' icon, usually a cogwheel.
- Find 'About Phone' or 'About Device': Scroll down and tap on 'About Phone', 'About Device', or sometimes 'System'.
- Look for SIM Status or eSIM Information: Within 'About Phone', you'll typically find 'SIM status', 'eSIM information', or a similar entry under 'Network & Internet'. Tap this.
- Identify EID: Your EID will be listed here. On some devices, you might need to tap on the specific eSIM profile to see its details.

Android Variations: Samsung, Pixel, and Others
Here's a quick cheat sheet for the big players:
| Device Brand | Typical Path to EID | Notes |
|---|---|---|
| Samsung Galaxy | Settings > Connections > SIM manager > Tap on your eSIM > EID | Often listed directly under the eSIM profile. |
| Google Pixel | Settings > Network & Internet > SIMs > Tap on your eSIM > EID | Very clean and direct interface. |
| OnePlus/Xiaomi | Settings > About Phone > SIM status / Device identifiers > EID | Can vary; sometimes requires a deeper dive into 'Device identifiers'. |
Uncovering Your eSIM Number on Windows Laptops
It's not just phones that use eSIMs anymore. Many modern Windows laptops, particularly those designed for business travel or with always-connected features, come with integrated eSIM support. This means you can keep working with mobile data without hunting for Wi-Fi or tethering your phone, which is a blessing when you're on a long-haul train or stuck in an airport lounge at Charles de Gaulle.
Step-by-Step Guide for Windows Users:
- Open Settings: Click the 'Start' button, then the 'Settings' cogwheel icon.
- Go to Network & Internet: In the Settings window, select 'Network & Internet'.
- Select Cellular: From the left-hand menu, click on 'Cellular'.
- Manage eSIM Profiles: Under the 'Cellular' section, look for 'Manage eSIM profiles'. Click this.
- Find EID: Here, you'll see a list of any installed eSIM profiles. Select the relevant profile (or click 'Properties' if available) and your EID will be displayed.
This is particularly useful for business travellers who rely on consistent connectivity for video calls and secure email. Imagine you're trying to get that last-minute report uploaded before your meeting, and your hotel Wi-Fi tanks. Having a reliable eSIM on your laptop, and knowing its EID for quick troubleshooting, can literally save your job. For more on navigating connectivity in the US, check out eSIMs for a USA road trip.

Why Windows eSIMs are a Game Changer for Budget Travelers
While my Substack focuses on €40/day budgets, sometimes you need to get work done. A laptop with an eSIM means you don't need to splurge on expensive hotel Wi-Fi or hunt down a cafe with decent speeds. You can buy a Cellesim USA plan for your laptop for, say, €15 for 5GB, and spread that out over a week. If you're consuming roughly 500MB per day for emails and light browsing, that's 5GB / 0.5GB per day = 10 days of connectivity for €15. Compare that to a €5/day hotel Wi-Fi charge, and you're saving €35. That's a week's worth of hostel beds in many parts of Southeast Asia. It's smart money management, not luxury.
The Real-World Impact of a Missing eSIM Number: Border Crossings and Beyond
I've seen it firsthand, and frankly, I've been there myself. Being without your EID in a tight spot is like having a car without its VIN. It just adds layers of bureaucracy and stress to an already stressful situation. Border crossings are prime examples.
Border-Crossing Edge Cases
Picture this: you're crossing from Thailand into Malaysia by bus, overland. You've got a fantastic multi-country eSIM that worked perfectly in Thailand, but suddenly, no data in Malaysia. You try the usual resets, airplane mode on/off, but nothing. You contact your eSIM provider's support, and they ask for your EID. You're trying to find it on your phone while the bus is stuck at immigration, people are looking at you, and the queue behind you is growing. This is not the time to be fumbling through menus you've never seen.
Or imagine you're flying from the UK to Spain, post-Brexit. You thought your O2 contract's roaming would cover it. Then you get a text: 'Welcome to Spain! Roaming charges apply: £2/MB.' Suddenly, that €18 Cellesim Europe plan for 10GB looks like a steal compared to your potential bill shock. You try to activate it, but the QR code is being finicky. The manual activation asks for the EID. Without it, you're either paying O2 a small fortune or trying to buy a physical SIM at Madrid-Barajas Airport for €30 (which, trust me, is not the best deal).
The Cost of Connectivity Fumbles
Let's do the math. On my last trip through the Balkans, I used about 750MB of data per day. Over 14 days, that's 10.5GB. A local physical SIM from A1 in Serbia cost me about 1,000 Dinar (€8.50) for 10GB. A Cellesim eSIM for the same region cost €15 for 10GB. The difference is €6.50. Now, if my eSIM failed, and I didn't have the EID to troubleshoot, I'd either be stuck with no data or paying my UK carrier, EE, a brutal £2.50/day roaming charge. That's £35 (approx €41) for 14 days, just for basic connectivity. Or I'd spend time and money hunting down a local SIM. The €6.50 saving from the local SIM is small change compared to the cost of being unprepared.
Troubleshooting Common eSIM Issues with Your EID
The EID is your golden ticket when things go wrong. It's the unique identifier that allows your provider to see exactly what's happening with your service on their network. Think of it as your digital passport for data. Without it, getting effective support is like trying to check into a hostel without your booking reference, a recipe for frustration and extra expense.
When to Provide Your EID to Support
- Activation Failure: If your eSIM isn't activating after scanning a QR code or manual input.
- No Network Connection: You've installed the eSIM, but your phone shows no signal or 'No Service'.
- Data Not Working: You have a signal, but cannot access the internet. This often points to APN settings issues.
- Transfer Problems: If you're trying to move an eSIM to a new device and encounter errors.
- Billing Discrepancies: In rare cases, if there's a problem with your plan's data allowance or validity.
Diagnosing Common Problems
Most eSIM issues boil down to a few core problems. Your EID helps the support team narrow it down:
| Problem Symptom | Likely Cause | How EID Helps |
|---|---|---|
| No Signal/No Service | eSIM not provisioned correctly, device compatibility, network roaming disabled. | Allows provider to check activation status and network access on their backend. |
| Data Not Working (with Signal) | Incorrect APN settings, data roaming off, expired plan. | Enables remote verification of plan validity and correct APN push. |
| Slow Data Speeds | Network congestion, fair usage policy throttling, device settings. | Helps identify if throttling is applied to your specific profile. |
Remember, always have your EID ready when contacting Cellesim support or any other provider. It speeds up the resolution process dramatically. You don't want to be caught in a foreign country, trying to explain your issue in broken English over a dodgy public Wi-Fi connection, only to be asked for a number you can't find.
eSIM vs. Physical SIM: The Real Cost Breakdown
I'm a budget backpacker, so I live by the numbers. And when it comes to data, the numbers usually lean towards eSIMs, especially for multi-country trips. But for a single country, a local physical SIM can sometimes edge it out, depending on where you are.
The Cheapest Local SIM Alternative
Let's be fair. In places like Vietnam or Thailand, you can get a physical SIM from a major carrier like Viettel or AIS for as little as 100,000 VND (around €3.70) for 5GB. Sometimes even less. You walk into a 7-Eleven, hand over your passport, and you're good to go. The process is quick, often takes less than 5 minutes, and the cost is unbeatable for a short stay. This is the benchmark.
However, once you cross a border, that physical SIM is useless. You're buying another one. That's two SIMs, two activations, two registration processes. For a two-week trip across, say, Vietnam, Cambodia, and Thailand, you're looking at three physical SIMs, likely costing you €10-€15 total, plus the time spent. And good luck getting support in English if something goes wrong.
The eSIM Advantage: Flexibility and Multi-Country Savings
This is where eSIMs shine. For that same multi-country trip, a Cellesim ASEAN plan for €25 might give you 10GB across all three countries. That's an extra €10-€15 upfront, but you get:
- One-time activation: Install once, use everywhere.
- English-speaking support: Crucial when you're troubleshooting from a hostel in Siem Reap.
- No physical SIM swaps: No losing tiny plastic cards.
- Instant activation: No hunting down a store or registering your passport.
For a traveller who plans to visit several countries, the convenience and reliable support of an eSIM often outweigh the marginally higher upfront cost of a local physical SIM. For more details on avoiding bill shock, see our guide on AT&T eSIM for International Travel.
How to Transfer Your eSIM Safely with Your EID
Upgrading your phone? Need to move your active eSIM plan to your shiny new device? Your EID is essential for a smooth transfer. While many modern phones, especially iPhones, offer simplified eSIM transfer options, sometimes you'll need that EID to manually facilitate the move or to provide it to your carrier.
EID for Apple's Quick Transfer Feature
Apple's iOS has a pretty neat feature that allows you to transfer an eSIM from an old iPhone to a new one during the setup process, or later via the Cellular settings. This often works seamlessly, but under the hood, your EID is being used to communicate with the carrier's systems to re-provision your profile on the new device.
If the automatic transfer fails, your carrier might ask for the EID of both the old and new devices to perform a manual transfer. This is why it's always smart to have both readily available, just in case.
Manual eSIM Transfer Process
For Android devices, or if Apple's automatic transfer isn't an option (e.g., selling your old phone before getting a new one), you'll typically follow a manual process:
- Deactivate eSIM on Old Device: Go to Settings > Cellular/Network & Internet, select your eSIM profile, and choose 'Remove Data Plan' or 'Delete eSIM'. Confirm the deletion.
- Note Old EID (Optional, but Smart): Before deleting, make a note of the EID from your old device, just in case.
- Contact eSIM Provider: Inform your provider (e.g., Cellesim) that you wish to transfer your active plan to a new device. They will likely ask for the EID of your *new* device.
- Receive New QR Code/Activation Details: Your provider will generate a new QR code or manual activation details for your plan, linked to your new device's EID.
- Install on New Device: Follow the usual eSIM installation process on your new phone using the new QR code or details.

This process ensures that your existing data plan, which you've already paid for, isn't lost in the ether. It’s a crucial step for maintaining your budget and avoiding the need to buy a whole new plan because of a phone upgrade.
Securing Your eSIM Number: Best Practices
Your EID is a unique identifier, but it's not quite as sensitive as, say, your credit card number or passport. Still, it's part of your device's identity, and like any other piece of personal tech information, it's best to keep it private.
Why Keep Your EID Private?
While an EID alone can't grant someone access to your personal data or phone, it could potentially be used in conjunction with other information to impersonate you to a carrier. For example, if someone had your EID and other personal details, they might try to transfer your eSIM profile to their device, effectively stealing your data plan or even your phone number. This is rare, but why take the risk?
Tips for Protecting Your EID
- Only Share with Trusted Support: Only provide your EID to official customer support channels when specifically requested for troubleshooting or activation.
- Avoid Public Display: Don't post screenshots of your 'About Phone' or 'Settings' pages on social media, as these often contain your EID.
- Secure Your Device: Always keep your phone, tablet, or laptop locked with a strong passcode, PIN, or biometric security. This prevents unauthorized access to your settings, including your EID.
- Be Wary of Phishing: If you receive an unsolicited email or message asking for your EID, be suspicious. Always verify the sender's legitimacy.
By being mindful of where and when you share your EID, you add another layer of security to your digital life, ensuring your travel connectivity remains your own. For common questions about eSIMs and more, remember to check out our Cellesim FAQ page.
Frequently Asked Questions
What is an eSIM number (EID)?
An eSIM Identification Document (EID) is a unique 32-digit serial number embedded in your device's eSIM chip. It identifies your eSIM hardware globally and is essential for activating, managing, and troubleshooting your digital SIM profiles with network providers.
Can I have multiple EID numbers on one device?
No, each eSIM-compatible device has only one fixed EID number, as it's tied to the physical eSIM chip inside the device. However, you can store multiple eSIM *profiles* on a single EID.
Why is my EID not showing up in my phone's settings?
If your EID isn't visible, it might be because no eSIM profile has been activated on the device yet. Try installing even a small, free eSIM plan, and then recheck. A simple device restart or ensuring your operating system is updated can also resolve display issues.
Is my EID the same as my phone's IMEI?
No, the EID is distinct from your phone's International Mobile Equipment Identity (IMEI). The IMEI identifies the physical phone hardware itself, while the EID specifically identifies the embedded eSIM chip within that device.
Can I transfer my EID to another phone?
You cannot transfer an EID, as it's permanently linked to your device's hardware. However, you can transfer your *eSIM profile* (your data plan) from one device to another. This process usually involves your carrier using the EID of your new device to provision the existing plan.
What should I do if my eSIM isn't working and I can't find my EID?
First, try restarting your device and checking your settings again. If still unsuccessful, contact your eSIM provider's support. They may have alternative methods to verify your account, but finding your EID should be your priority for faster resolution.