You’re back from an incredible trip. Your camera roll is full of memories, your mind is buzzing with new experiences, and your phone's cellular settings look like a well-stamped passport. Listed there are the digital remnants of your journey: "Italy Data Plan," "Japan 15-Day eSIM," "Mexico Connect." While they served you well, they’re now just digital clutter. Knowing how to properly delete an eSIM is a simple but essential piece of travel tech hygiene. It keeps your device organized, frees up valuable space for your next adventure, and prevents confusion when you're trying to get connected at a new destination. For many travelers, figuring out how to get instant internet abroad without changing your SIM card is the first step, and managing those digital SIMs afterward is the final chapter of a successful trip.
- Introduction: The Digital Souvenirs You Don't Need
- Why Bother Deleting an Expired eSIM?
- Before You Delete: A Quick Pre-Flight Check
- Step-by-Step Guide: How to Delete an eSIM on iPhone
- Step-by-Step Guide: How to Delete an eSIM on Android (Samsung & Pixel)
- eSIM Management Best Practices for Frequent Travelers
- Troubleshooting Common eSIM Deletion Issues
- Common Questions and Traveler Scenarios
- Frequently Asked Questions
- Conclusion: A Clean Slate for Your Next Journey
Ready for Your Next Adventure? Get a Cellesim eSIM.
Connect instantly in over 200+ countries with reliable, high-speed data. Join 50,000+ happy customers who travel smarter.
Shop eSIM Plans ⚡
Introduction: The Digital Souvenirs You Don't Need
Digital clutter can be as overwhelming as physical clutter. Just as you wouldn't keep expired train tickets or old foreign currency indefinitely, managing your digital eSIM profiles is a practice that contributes to a more organized and efficient travel experience. Understanding how to remove these profiles ensures your device remains optimized and ready for future journeys, eliminating any potential confusion or technical slowdowns.
Why Bother Deleting an Expired eSIM?
It might seem like a harmless list in your settings, but letting expired eSIMs pile up can cause a few headaches down the line. Think of it as cleaning out your wallet after a trip; you keep the meaningful mementos and discard the old receipts. Here’s why this digital cleanup is so important for effective travel eSIM management.
Reduce Clutter and Avoid Confusion
Imagine landing at Charles de Gaulle Airport in Paris, ready to activate your new France eSIM. You open your cellular settings only to be greeted by a long list of past plans: "Spain Summer," "UK Weekend," "Germany Business." Which one is which? Accidentally trying to activate an old, expired plan can cause frustrating delays when all you want to do is book a ride to your hotel. A clean list with only your current, active plans makes managing your connectivity straightforward and stress-free.
Free Up Limited eSIM Slots
This is the most critical reason. While you can typically only use one or two eSIMs at a time, most modern smartphones can store a limited number of eSIM profile, usually between 8 and 20, depending on the model. This might sound like a lot, but for a frequent traveler, these slots can fill up surprisingly fast. If you hit your device's limit, you won't be able to install a new eSIM until you remove an old one. Deleting expired profiles ensures you always have room for your next journey. You can always check the specifications for eSIM compatible devices to see how many your specific model supports. For more details on eSIM technology, you can refer to resources like the GSMA's eSIM information page.
Enhance Security and Privacy
While the risk is generally low with prepaid data-only eSIMs, it’s good security practice to remove any network profile that is no longer in use. Each eSIM profile contains unique identifiers and credentials for connecting to a specific mobile network. Removing the profile severs that link completely, ensuring your device isn't holding onto unnecessary network configurations. It’s a small step that contributes to better overall digital security, reducing the digital footprint associated with past travels.
Before You Delete: A Quick Pre-Flight Check
Deleting an eSIM is usually a permanent action, so it pays to take 30 seconds to confirm a few things. Think of this as checking your luggage tags before a flight, a quick verification can prevent a major hassle.
Confirm the eSIM is Truly Expired or Unneeded
First, be absolutely sure the eSIM data plan is depleted or has expired. Some regional or long-term eSIMs might still have a small amount of data or a few days of validity left that could be useful. You can typically check the status through your phone's cellular settings or, more accurately, via the provider's app or website. If you're unsure, our guide on how to check eSIM data usage and top up instantly provides detailed steps for monitoring your plan's status.
Understand the 'Point of No Return'
For the vast majority of prepaid travel eSIMs, like those from Cellesim, the activation QR code is a one-time-use key. Once you delete the eSIM profile from your device, it is gone for good. You cannot simply re-scan the original QR code to reinstall it. This is a crucial distinction: you are not just deactivating the eSIM, you are permanently erasing its cryptographic keys from your phone's secure element. Don't hit delete unless you are 100% certain you won't need that specific plan again.
Save Any Necessary Information (Just in Case)
While rarely needed, it doesn’t hurt to take a quick screenshot of the eSIM details before you delete it. This screen usually shows the carrier name, and sometimes an ICCID number or an associated phone number. If you ever need to contact customer support about that specific plan, having a record of its details can be helpful. This small step can save time and frustration if an unexpected issue arises, although Cellesim's intuitive platform aims to make your experience seamless from start to finish.
Step-by-Step Guide: How to Delete an eSIM on iPhone
Apple makes managing eSIM profiles straightforward within the iOS settings. The process is consistent across recent iPhone models. Here’s exactly how to remove an expired travel eSIM from your iPhone.
- Open Settings: Tap the grey gear icon on your home screen to open the Settings app.
- Navigate to Cellular: Tap on Cellular (or Mobile Data in some regions). This will show you all your SIMs, both physical and digital.
- Select the eSIM: Under the 'SIMs' heading, you'll see a list of your installed plans. They are often labeled with names you assigned, like "Travel eSIM" or the name of the carrier. Tap on the specific eSIM you wish to delete.
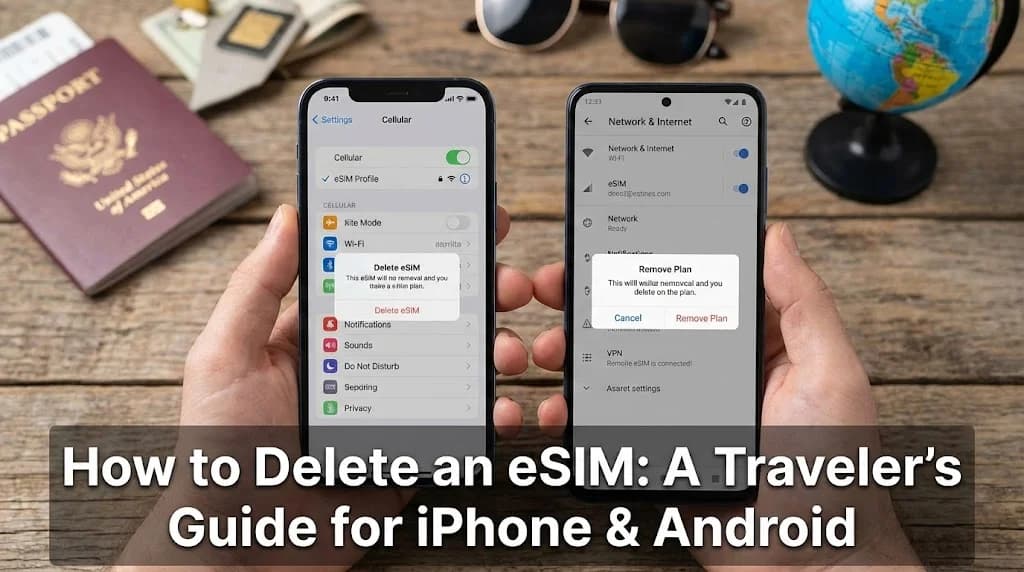
- Find the Delete Option: Scroll to the very bottom of the screen for that eSIM's details. You will see a red option labeled Delete eSIM.
- Confirm Your Choice: A pop-up message will appear asking you to confirm. It will warn you that the action cannot be undone. Tap Delete eSIM again to finalize the removal.
That's it. The eSIM will vanish from your list, freeing up a slot for your next adventure. Now that you've cleared space, you can start planning for your next trip. If you're heading to Europe, for instance, you can easily install a new Spain eSIM in minutes before you depart. For more detailed guidance on iOS device settings, refer to Apple's official support documentation.
 - Cellesim eSIM")
Step-by-Step Guide: How to Delete an eSIM on Android (Samsung & Pixel)
The Android ecosystem is a bit more varied, as manufacturers like Samsung and Google have their own user interfaces. However, the core process is very similar and is always managed through the network or SIM settings. Here are the steps for the most popular Android devices.
For Samsung Galaxy Devices
Samsung’s One UI places SIM management in a dedicated section, making it easy to find.
- Open Settings: Swipe down and tap the gear icon, or find it in your app drawer.
- Go to Connections: This is usually the first option at the top.
- Tap on SIM Manager: Inside Connections, you'll find the SIM manager. This is your command center for all things SIM-related.
- Select and Remove the eSIM: You'll see a list of your installed eSIMs. Tap the one you want to get rid of. You will then see an option to Remove.
- Confirm the Deletion: A prompt will ask if you're sure you want to remove the eSIM. Tap Remove again to confirm.
For Google Pixel Devices
Google's stock Android experience is clean and direct, with the process being just as simple.
- Open Settings: Access it from your app drawer or by swiping down from the top.
- Go to Network & internet: Tap on this option.
- Tap on SIMs: This will show your physical SIM and any installed eSIMs.
- Select and Erase the eSIM: Tap on the eSIM profile you want to delete. Scroll down to the bottom of the page and tap the option labeled Erase SIM.
- Confirm the Action: A final confirmation screen will appear, warning you that this will erase the SIM from your phone. Tap Erase to complete the process.
No matter your device, the process takes less than a minute. By keeping your SIM manager tidy, you're always prepared for the next trip, whether it's installing a new United States eSIM for a business conference or a regional plan for a backpacking tour. For specific model information, consult your device manufacturer's support pages, such as Google Pixel Support or Samsung Support.
eSIM Management Best Practices for Frequent Travelers
For those who travel extensively, effective eSIM management can significantly streamline connectivity. Adopting a few simple habits ensures you're always prepared for seamless internet access, wherever you land.
Label Your eSIMs Clearly
When installing a new eSIM, your phone often gives you the option to label it. Take advantage of this. Instead of generic names like "Secondary" or "Business," use clear descriptors such as "Cellesim Italy - 10GB - Exp. July," or "Japan Travel eSIM." This makes it effortless to identify active versus expired plans, reducing the risk of confusion when you're managing multiple profiles.
Monitor Your Device's eSIM Slot Limit
As discussed, most smartphones can store a finite number of eSIM profiles. If you frequently switch destinations, be mindful of this limit. Periodically check your "SIMs" or "SIM Manager" section in settings and proactively delete any truly expired or unneeded profiles. This prevents you from encountering an error message when trying to install a new eSIM in a crucial moment. The specific number of supported eSIMs varies by device model, which you can often find in your phone's specifications or through an eSIM checker.
Leverage Dual SIM Functionality
Modern phones with eSIM capabilities often support dual SIM functionality, allowing you to use your primary physical SIM for calls/texts and an eSIM for data. This is an ideal setup for international travel. Ensure your settings are configured correctly to route data through your active travel eSIM while keeping your home number active for important communications. Our guide on how to use dual SIM on iPhone provides comprehensive instructions for this setup.
Understand Reinstallability (or Lack Thereof)
Most travel eSIMs are designed for single installation. This means once deleted, the QR code cannot be used again. However, some carrier-specific eSIMs (especially those from your home provider) might be reinstallable from your carrier's app or by requesting a new QR code. Always clarify this with your provider if you anticipate needing to reinstall an eSIM. For Cellesim plans, assume they are single-use installations once activated and then deleted.
Troubleshooting Common eSIM Deletion Issues
While deleting an eSIM is generally straightforward, you might occasionally encounter a minor hiccup. Knowing how to address these common issues can prevent frustration.
"Delete eSIM" Option is Missing or Greyed Out
If you don't see the "Delete eSIM" or "Remove SIM" option, or it's unavailable, consider these possibilities:
- Device Compatibility: Ensure your phone truly supports eSIMs. While this article assumes it does, older models might not. You can verify your device using Cellesim's eSIM compatibility checker.
- Managed Device: If you're using a company phone or a device with Mobile Device Management (MDM) software, your administrator might have restricted eSIM management.
- Active Carrier Plan: In rare cases, if the eSIM is tied to a postpaid contract, the option to delete might be managed through your carrier's app or website rather than directly from phone settings. Contact your carrier for assistance.
Accidentally Deleted an Active eSIM
This is the most impactful error. If you accidentally delete an eSIM that still has active data or validity, it's typically irreversible for prepaid travel eSIMs. Your data is gone, and the QR code cannot be reused.
- Immediate Action: The first step is to contact Cellesim support directly. While we cannot restore a deleted single-use eSIM, explaining the situation promptly might allow us to offer guidance or solutions, such as purchasing a new plan.
- Prevention: Always perform the "Pre-Flight Check" steps. Double-check the eSIM's name and status before confirming deletion.
eSIM Not Fully Removed After Deletion
In rare instances, you might delete an eSIM, but its name still appears in your settings list, or you encounter a residual error. This can usually be resolved with a simple restart.
- Restart Your Device: After deleting an eSIM, if you notice any lingering issues, perform a full restart of your smartphone. This refreshes the cellular modem and network settings, often clearing any phantom profiles.
- Update Software: Ensure your phone's operating system is up to date. Software bugs can sometimes cause minor display issues that are resolved with the latest updates.
Common Questions and Traveler Scenarios
Even with clear steps, real-world travel can throw a few curveballs. Here are some common situations travelers encounter when managing their eSIMs.
"I deleted my eSIM by mistake! Can I get it back?"
This is the most common fear, and unfortunately, the answer is usually no. As mentioned, most travel eSIMs from providers like Cellesim are single-use. Once erased, the profile cannot be reinstalled with the same QR code. Your best course of action is to contact the provider's customer support immediately at [email protected]. While they likely can't restore the exact same profile, they may be able to assist with a replacement or alternative depending on the circumstances.
"Does deleting the eSIM cancel my plan?"
This is an important distinction. Deleting the eSIM profile from your phone does not cancel a service agreement. For a prepaid, fixed-data travel eSIM, the plan is already paid for, and deleting it simply removes your ability to use the data. The data itself expires according to the plan's validity period, regardless of whether the profile is on your phone. If you were on a monthly postpaid plan (which is rare for travel eSIMs), deleting the profile would not stop the billing. You would need to contact the carrier directly to formally cancel the service.
"My phone shows 'No SIM' after deleting. Is that normal?"
Yes, this is perfectly normal if the eSIM you deleted was the only active cellular plan on your device, or if it was your designated line for data. Your phone is simply telling you it no longer has an active SIM for that function. You can go back into your cellular settings and ensure your primary physical SIM (or another eSIM) is properly configured for calls, texts, and data. This is a key reason why understanding how to avoid roaming charges and stay connected abroad involves managing which SIM is active at any given time.
"What if I plan to revisit a country soon? Should I keep the eSIM?"
If your eSIM plan is truly expired or depleted, there's no benefit to keeping it installed. Even if you revisit the same country, you'll need a new data plan. It's best to delete the old profile and purchase a new eSIM when you're ready for your next trip. This ensures you always have the most current and relevant plan for your travel dates and data needs. You can browse all available plans for your next destination on cellesim.com.
Frequently Asked Questions
Why can't I reinstall my Cellesim eSIM after deleting it?
Cellesim eSIMs, like most prepaid travel eSIMs, are designed for one-time installation. Once you delete the eSIM profile from your device, the associated QR code becomes invalid, and you cannot use it to reinstall the same plan. Always ensure you no longer need a plan before deleting it.
Will deleting my eSIM affect my primary phone number?
No, deleting a travel eSIM will not affect your primary phone number, which is typically tied to your physical SIM card or a separate eSIM profile from your home carrier. Your home number remains active for calls and texts as long as that SIM is enabled, and your eSIM data plan operates independently.
How many eSIMs can my phone store?
Most modern smartphones can store between 8 and 20 eSIM profiles, though you can only use one or two at any given time for active data. This limit is separate from the number of physical SIM slots. Deleting expired eSIMs frees up these storage slots for future use.
Is it safe to keep expired eSIMs on my phone?
While generally low risk for data-only eSIMs, it's best practice to delete expired profiles. Keeping them can clutter your settings, lead to confusion, and in some rare cases, might retain unnecessary network identifiers. A tidy SIM manager is a more secure manager.
Can I delete an eSIM if I'm not connected to the internet?
Yes, you can delete an eSIM profile from your phone's settings without an active internet connection. The deletion process occurs locally on your device's secure element. However, checking the eSIM's remaining data or validity, or installing a new eSIM, will require internet access.
What should I do if my "Delete eSIM" option is greyed out?
If the delete option is greyed out, first ensure the eSIM is not your primary active data line. If it's still an issue, restart your phone. In rare cases, a device management profile or a carrier-specific eSIM might restrict deletion. Consult your device's support pages or Cellesim support if the problem persists.
Stay Connected, Simply
Experience seamless mobile data worldwide with Cellesim. Choose from flexible plans in over 200 countries and enjoy instant connectivity from the moment you land.
Find Your Next eSIM Plan
Conclusion: A Clean Slate for Your Next Journey
Managing your digital life is just as important as packing your physical suitcase. Taking a moment to delete an eSIM once your trip is over is a small act of digital hygiene that pays off. It keeps your device's settings clean, prevents confusion on future travels, and most importantly, ensures you always have space to add the connectivity you need for your next destination.
By following these simple steps, you can confidently manage your eSIM profiles on any device. Now that your phone is clear, organized, and ready for its next adventure, you can focus on the exciting part: planning where to go next. With a fresh slate, you’re just a few taps away from seamless connectivity, wherever your travels take you with Cellesim.